The Champion 2500-watt dual-fuel inverter generator produces 1815 running watts using gasoline, providing a viable alternative to premium suitcase-style models. By supporting both propane and gasoline, this unit offers flexibility for camping trips or residential power outages. I have detailed the unboxing, assembly, and testing procedures for this device below.
⚡ Quick Guide: How to Make It in 15 Steps
- Unbox unit and inventory supplied components.
- Verify oil fill level.
- Attach hour meter to casing.
- Bleed propane line using choke.
- Perform initial gasoline startup test.
- Connect propane tank and verify seal.
- Monitor load during break-in period.
- Clear carburetor fuel to prevent blockage.
- Utilize non-ethanol fuel for engine maintenance.
- Inspect panel alignment and service access.
- Apply electrical load to test inverter regulation.
- Confirm operation of safety sensors.
- Test economy mode for fuel efficiency.
- Compare idle stability between fuel types.
- Execute oil replacement after five hours.
📋 In This Article
- Technical Specifications & Components
- Tools & Materials Used — what you will need for this project
- Unboxing the Champion Inverter Generator
- Inspecting Propane Regulator and Hose
- Accessing the Engine Service Panel
- Understanding the EZ Start Dial
- Checking Control Panel and Outlets
- Assessing Dual Fuel Value
- Installing the Inductive Hour Meter
- Gasoline Testing and Fuel Notes
- Evaluating Door Panel Fitment
- Initial Gasoline Run Test
- Transitioning to Propane Operation
- Propane Setup and Testing
- Starting the Unit on Propane
- Eco Mode and Load Testing
- Final Verdict and Maintenance Tips
- FAQ
📊 Technical Specifications & Components
| Starting Watts | 2500W |
| Running Watts (Gasoline) | 1815W |
| Fuel Types | Gasoline and Propane |
| Oil Requirement | 10W-30 |
| Outlets | 20A Duplex |
| Features | CO Shield, Eco Mode, USB-A Ports |
📊 Project Overview & Costs
🔧 Difficulty Level: Medium
⏱️ Time Investment: DIY: 1-2 hours | Pro: 45 minutes
💰 Professional Service Cost: $500 - $600 for the generator plus $12 for an hour meter
💡 Verdict: Lower entry cost compared to premium competitors with added dual-fuel versatility.
🛠️ Tools & Materials Used
• Inductive Hour Meter
• Double-sided 3M Tape
• Zip Ties
• Non-ethanol Fuel
Step-by-Step Guide
Unboxing the Champion Inverter Generator
I unpacked the box to organize the components. The shipment includes a propane regulator, hose, funnel, and a small container of oil. It is a complete starter kit. Many expensive units exclude these items, so this is a practical inclusion. It was ready for service immediately.

Inspecting Propane Regulator and Hose
The supplied propane line measures roughly 2.3 feet. This is restrictive for larger fuel containers. I prefer 30-pound propane tanks for extended operation. Longer lines are available from the manufacturer. The regulator attaches to the handle for convenient storage.

Accessing the Engine Service Panel
The side panel removes with a quick turn of the integrated knobs. This design simplifies oil changes and spark plug maintenance. The cover for the spark plug slides out easily. The layout is well-engineered. I did not require specialized tools for basic service.

Understanding the EZ Start Dial
The central dial manages the ignition settings. Propane, gasoline, and choke positions are consolidated here. Propane starting requires purging the line to remove air. I engaged the choke to clear the system. Once the fuel path was purged, the unit started immediately. The operation is consistent.

Checking Control Panel and Outlets
The panel includes dual USB-A ports and 20-amp duplex outlets. The low-oil safety light is clearly visible. The weather-resistant covers on the outlets are functional. The interface is intuitive. Every function is labeled for accessibility.

Assessing Dual Fuel Value
Dual-fuel functionality distinguishes this model from its competitors. It provides versatility and improved runtime. I find this feature advantageous compared to gasoline-only machines. The system performs reliably. It offers excellent value for the investment.

Installing the Inductive Hour Meter
I purchased an affordable inductive hour meter. Installation involves wrapping the wire around the spark plug cable. I secured the unit with double-sided tape to avoid drilling the casing. The device tracks engine run time accurately.

Gasoline Testing and Fuel Notes
I utilized non-ethanol fuel to minimize carburetor deposits. This is a effective strategy for longevity. I have used premium small-engine fuel with positive results. The engine idle stabilized quickly.

Evaluating Door Panel Fitment
The side door panel presents alignment challenges due to the placement of the tabs. Securing it flush required patience. The fitment is not perfect. This was the only problematic aspect of the design.

Initial Gasoline Run Test
Due to the ambient temperature, I engaged the choke for startup. The engine started on the first attempt. I positioned the unit under a table for weather protection. The eco-mode operation is quiet. The performance is satisfactory.

Transitioning to Propane Operation
My goal was to complete the five-hour break-in before performing an oil change. The transition to propane is straightforward. I kept the choke engaged during the initial phase to bleed air from the line. Following the purge, I transitioned to the run setting. The transition was successful.

Propane Setup and Testing
The connection process is simple. I bled the line carefully to ensure a consistent feed. Pacing is necessary during this stage. The assembly is straightforward. Propane burns cleaner than gasoline.
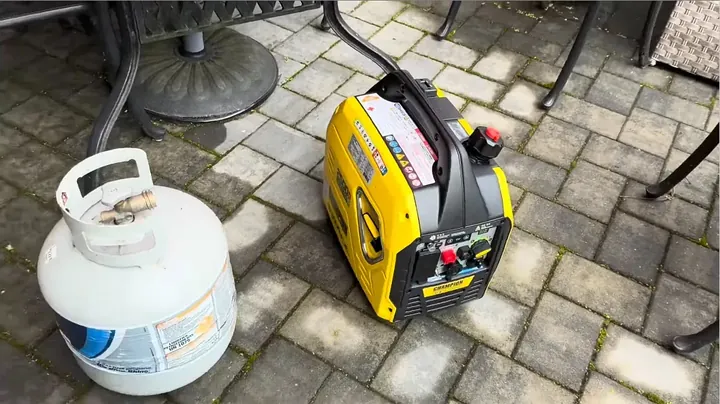
Starting the Unit on Propane
I initiated the starting sequence with five pulls while on choke. Upon switching to the run position, the engine started. I am satisfied with this result. The process is consistent. It is a reliable mechanism.

Eco Mode and Load Testing
The engine idles at a higher frequency on propane to maintain power output. The noise level remains within acceptable limits. I used a space heater to verify load management. The unit handled the load efficiently. It is a robust machine.

Final Verdict and Maintenance Tips
The spark plug boot access is restricted. I used an external tool to remove it. A larger access port would be an improvement. Otherwise, I am satisfied with the unit. It is well-constructed. It performs as expected.

⚠️ CAUTION: SAFETY WARNING!
Operate equipment outdoors exclusively to prevent carbon monoxide accumulation. Do not refuel an engine that is hot.
Summary & Tips
The Champion 2500W Dual Fuel Inverter represents high value. It supports two fuel types efficiently while maintaining low noise output. Although the side panel and spark plug access require refinement, the performance is robust. It is a reliable tool for garage or outdoor use.
📋 FAQ
❓ Is the Champion 2500W quieter than other generators?
Noise output is low. The unit is quieter than open-frame generators and comparable to other suitcase inverters.
❓ Can I run this in an enclosed garage?
No. CO sensors are present, but operation within enclosed areas is hazardous. Maintain outdoor placement.
❓ Does it come with oil?
A small initial bottle is provided. Fill the reservoir to the indicator threads.
❓ Why is the propane hose so short?
The included line length is 2.3 feet. Extended lines are available via the manufacturer.
❓ Is it hard to start on propane?
Startup is reliable if the fuel line is purged of air initially.
Disclaimer: Tools for this project were purchased personally to facilitate an objective review. This article contains affiliate links; commissions are earned on qualifying purchases at no cost to the user.