Bad battery connections in a DC system can lead to voltage drops, overheating, and premature battery wear. That’s a real problem. The Victron Lynx Power In unit, while great for power distribution, doesn’t come with built-in fuse holders. This modification shows you how to add those critical fuses, turning your standard Lynx Power In into a protected distribution hub. It’s about making your system safer and more efficient.
⚡ Quick Guide: How to Make It in 10 Steps
- Understand battery connection issues and Lynx Power In.
- Choose the right Lynx Power In model, M8 or M10.
- Open the unit, identify busbars, and existing terminals.
- Remove cover screws to begin fuse modification.
- Assemble screw, washers, and nut for fuse holder.
- Secure all four modified screws into the plastic cover.
- Add remaining washers and nuts for fuse connections.
- Ensure correct washer height for flat fuse seating.
- Install final flat and grower washers with nuts.
- Plan your system carefully; consider dedicated fuse distributors.
📋 In This Article
- Technical Specifications & Components
- Tools & Materials Used — what you will need for this project
- Understanding Battery Bank Connection Issues
- Choosing Between Lynx Power In M8 and M10
- Inspecting the Lynx Power In Interior
- Modifying the Lynx Power In to Add Fuse Holders
- Assembling the Fuse Terminal Bolts
- Modification to add fuses
- Stacking Washers and Nuts for Fuse Connections
- Ensuring Proper Fuse Seating Height
- Finalizing Fuse Holder Assembly with Locking Washers
- Final Considerations and System Planning
- FAQ
📊 Technical Specifications & Components
| Device Type | DC Power Distribution Module / Busbar |
| Brand | Victron Energy |
| Model | Lynx Power In |
| Current Rating | Up to 1000 Amperes DC |
| Voltage Range | 9V to 60V |
| System Compatibility | 12V, 24V, 48V installations |
| Terminal Sizes | M8 or M10 (for external connections) |
| Internal Terminals | 4 positive, 4 negative (M8 size) |
| Modification Hardware | M8 x 30 inox screws (4), M8 inox nuts (8), M8 inox flat washers (16), M8 inox grower washers (4) |
📊 Project Overview & Costs
🔧 Difficulty Level: Medium
⏱️ Time Investment: DIY: 2 hours | Pro: 45 minutes
💰 Professional Service Cost: $125 - $250 (parts + labor)
💡 Verdict: This mod saves you from buying a more expensive dedicated distributor, protecting your system from serious damage.
🛠️ Tools & Materials Used
• Victron Lynx Power In (M8 or M10)
• M8 x 30 inox screws (4 pieces)
• M8 inox nuts (8 pieces)
• M8 inox flat washers (16 pieces)
• M8 inox grower washers (4 pieces)
Step-by-Step Guide
Understanding Battery Bank Connection Issues
First thing — you gotta know that poorly set up battery banks are a real headache. Installers and solar enthusiasts often overlook critical errors that cause efficiency loss, power outages, or even fire hazards. This isn't just theory; we've seen systems cook themselves. The Victron Lynx Power In steps in here as a DC power distribution module, designed to simplify and secure your setup. It works like a heavy-duty busbar, letting you hook up batteries, chargers, and other loads to a single, organized point. It supports a hefty 1000 Amperes DC and works for 12V, 24V, and 48V systems, covering a voltage range from 9V to 60V. This thing is the nerve center for any well-designed DC power system. It's solid.

Choosing Between Lynx Power In M8 and M10
Look, when you're picking out a Lynx Power In, you'll see M8 and M10 versions. These numbers refer to the size of the terminal holes for connecting to other Lynx products or your main cables. You gotta stick with the same size if you plan on expanding your system. My advice? If you're starting fresh, go straight for the M10. All the newer Lynx gear is standardized on M10, which means easier expansion down the road. Mixing and matching different metric sizes is just asking for trouble. It's simple. Plan ahead and make your life easier.

Inspecting the Lynx Power In Interior
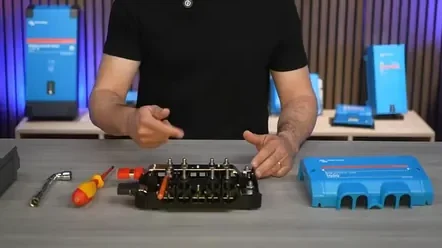
To get this unit open, you just need to pop out those two screws on the casing. Easy enough. Once that's off, you'll see the positive busbar sitting up top and the negative one down below. Lift up those clear protective covers, and you'll find four M8 terminal screws on the negative side and another four M8 screws on the positive side. Here's the kicker: this unit, the Lynx Power In, doesn't have any built-in fuse holders. That's the difference between this and a Lynx Distributor. A distributor comes with the fuses already. We're gonna change that.

Modifying the Lynx Power In to Add Fuse Holders
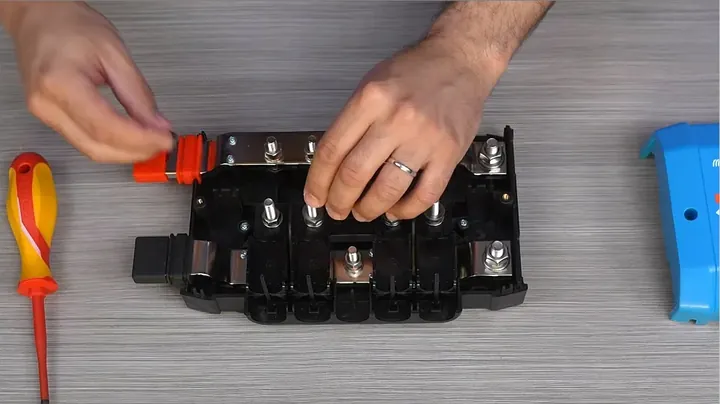
This is where the real work starts. We're gonna do a small modification, adding four screws to the Power In unit. This turns it into a 'half-distributor,' letting you protect your individual lines with fuses. First thing — take out those four screws holding the plastic cover in place. Once those are off, you're left with this plastic cover that we'll modify to hold our fuse terminals. You'll need specific hardware for this: four M8 x 30 inox screws, eight M8 inox nuts, sixteen M8 inox flat washers, and four M8 inox grower washers. All stainless steel, of course. Those specs matter.

Assembling the Fuse Terminal Bolts
The assembly sequence is pretty straightforward, but you gotta get it right. Grab an M8 x 30 screw, slide on a flat washer, then another flat washer, and finally, thread on an M8 nut. Don't crank it down tight yet. The trick here is to make sure the head of the screw sits perfectly in the hexagonal base on the cover. It needs to snug right in there. This ensures a solid, flush fit. That's the whole trick.

Modification to add fuses
Once you've got the screw head properly seated, you can put the cover back onto the base. See how the screw is still a bit loose? Now's the time to tighten that nut down. Get it good and snug. This makes sure the screw head aligns perfectly with the hexagon molded into the base. We're gonna repeat this same process for all four screws. Now you've got all four bolts firmly in place on that plastic cover. It's good to go.

Stacking Washers and Nuts for Fuse Connections
Now that the main bolts are in the cover, we're not working directly on the cover itself anymore. To make tightening easier, we can temporarily put the four screws that hold the casing to the base back in. With the four nuts from our modification now tightened, we need to add the rest of the washers and nuts for the actual fuse connections. The order matters. I'll drop the full list of nuts, washers, and screws in the video description for you. You'll add another flat washer to each screw. This arrangement makes it clear and simple to see once we take that first screw off.
Ensuring Proper Fuse Seating Height
Here's the deal: the height of this busbar needs to match the height of your washer stack. Why does that matter? Simple. When you install your MEGA fuse, you want it to sit absolutely flat on that busbar. If it's not flat, you're asking for trouble. You'll get mechanical stress, and worse, electrical stress on the fuse itself. It fails. We want that fuse sitting perfectly flush, no wobbles, no gaps. That means getting the right number and thickness of washers in there. It's critical for a reliable, safe connection.
Finalizing Fuse Holder Assembly with Locking Washers
Now, for the final connections. You'll want to place flat washers on both the top and bottom terminals of the cable you're connecting, especially for that M8 terminal. Then, just like on the top flat washer, you'll add a grower washer. That grower washer is key. It's there to prevent the nut from loosening up over time due to vibration or thermal expansion and contraction. Finally, add the corresponding nut and tighten it down properly. That's how you modify your Lynx Power In to put a fuse in each of those lines. You can put in four fuses, or just one for the circuit that really needs it. It works.

Final Considerations and System Planning
Honestly, I wouldn't recommend this mod if you're building a new system from scratch. The price difference between a standard Lynx Power In and a Lynx Distributor (which already has the fuse holders) ain't that big. You're better off just getting the right tool for the job from the start. Plan your system out correctly in the design phase. Figure out how many Lynx Power In modules you need, and how many distributor connections you'll also need. That way, everything is factory-spec and you don't have to hack anything together. Sometimes, saving a few bucks up front costs you more in headaches down the line.
⚠️ CAUTION: SAFETY WARNING!
Working with high-current DC systems carries significant risk of electrical shock and fire. Always disconnect power sources and verify no voltage is present before making any modifications or connections.
Summary & Tips
Modifying a Victron Lynx Power In to add fuse holders is definitely doable, and it can save you a few bucks if you're handy. Just remember, a dedicated Lynx Distributor comes with all that protection built-in from the factory. For a new build, seriously consider the purpose-built distributor. Sometimes, the extra cost upfront saves a whole lot of headaches later on.
📋 FAQ
❓ Why is proper battery bank connection so important?
Yeah, bad connections are a killer. You'll see voltage drops, which means less power getting to your gear. Worse, loose or undersized connections can overheat, melt insulation, and even cause fires. It's not just about losing efficiency; it's about safety and protecting your expensive batteries from premature failure. Getting it right from the start avoids a ton of headaches.
❓ What's the main difference between Victron Lynx Power In and Lynx Distributor?
Honestly, it's pretty simple. The Lynx Power In is basically a heavy-duty busbar. It gives you a central point to connect your DC loads and sources. The Lynx Distributor, on the other hand, is built with fuse holders integrated right into the unit. It’s designed for distributing fused power to multiple circuits. This modification essentially tries to get the Power In to act more like a Distributor.
❓ Can I mix M8 and M10 Lynx components?
Nah, you really shouldn't. The M8 and M10 refer to the size of the bolts and holes used for connecting the units together. If you're building out a system that uses multiple Lynx modules, you need to stick with one size across the board. Trying to force different metric sizes together is just asking for loose connections and potential problems. Standardize early.
❓ What kind of fuses should I use with this modification?
Usually, for these high-current DC applications, you're looking at MEGA fuses. They're designed for serious amperage and are built tough. The specific amperage rating will depend entirely on the circuit you're protecting. Always match the fuse size to the wire gauge and the load it's powering to prevent overcurrent. Don't cheap out on fuses; they're the last line of defense.
❓ Is this modification worth doing, or should I just buy a Lynx Distributor?
Depends on your situation. If you already have a Lynx Power In and just need a few fused connections, this mod can save you from buying a whole new Distributor. It's a cost-effective hack. However, if you're starting a new system or need many fused outputs, a dedicated Lynx Distributor is usually the better, cleaner, and safer option. It's purpose-built, so it's less fuss. Sometimes, factory-designed is just better.
Disclaimer: I purchased all tools for this guide with my own money to ensure an unbiased review. This post contains affiliate links, meaning I earn a small commission if you make a purchase at no extra cost to you.