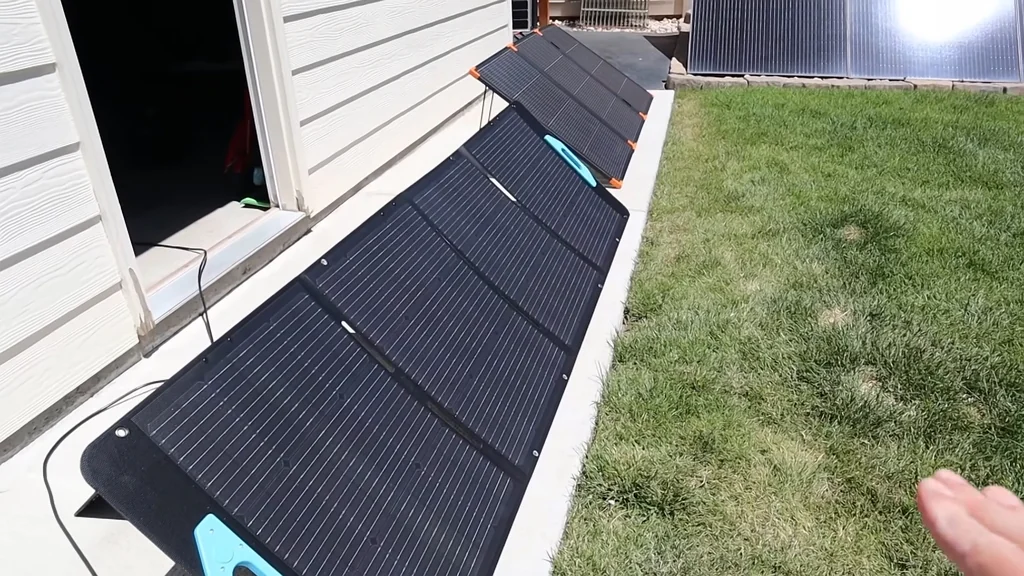
Bringing a Keystone Arcadia 294SLRD up to a robust 24V specification isn’t just about dropping in new batteries; it involves constructing a fully integrated power generation system. This particular rig received a substantial overhaul, retiring the dated 12V lead-acid configuration in favor of a 17.5 kWh LiFePo4 battery bank. about a significant power reserve for extended periods off the grid, transforming the Keystone Arcadia 24V upgrade into a truly pivotal modification.
⚡ Quick Guide: How to Make It in 15 Steps
- Wire 24V battery bank with Class T fuses.
- Connect SFK batteries for direct data flow.
- Install Victron MultiPlus inverter/charger.
- Route distant shore power to breaker box.
- Wire solar panels in series to MPPT.
- Integrate 24V to 12V step-down converter.
- Connect battery data via USB hub to Cerbo.
- Mount Victron GX Touch 50 display.
- Configure SFK Venus OS virtual battery driver.
- Enable battery balancing and heating functions.
- Adjust virtual battery voltage parameters.
- Set DVCC controlling BMS to virtual battery.
- Monitor individual battery state of charge.
- Install EcoWorthy bifacial solar panels.
- Fit AC unit with a soft start.
📋 In This Article
- Technical Specifications & Components
- Tools & Materials Used — what you will need for this project
- Wiring the 24V Battery Bank
- Integrating Battery Management Data
- Installing the MultiPlus Inverter/Charger
- Routing Shore Power and Breaker Setup
- Solar Panel Wiring and MPPT Controller
- 24V to 12V Conversion for Existing Circuits
- Battery Data Communication Setup
- Cerbo GX Touch 50 Display Overview
- Configuring the SFK Venus OS Driver
- Virtual Battery Balancing and Heating Functions
- Advanced Virtual Battery Settings
- Adjusting Distributed Voltage and Current Control (DVCC)
- Monitoring Individual Battery Parameters
- EcoWorthy Solar Panel Details and Installation
- AC Unit Soft Start Installation
- FAQ
📊 Technical Specifications & Components
| Battery Bank | 24V 17.5kWh |
| Batteries | (4) Sun Fun Kits 12V 340ELR 340Ah LiFePo4 |
| Inverter/Charger | Victron 24V 3000VA MultiPlus 2x120 |
| Shore Power Input | 50 amp |
| Solar Charge Controller | Victron 100/50 MPPT |
| Solar Panels | (4) EcoWorthy 195W Bifacial |
| Total Solar Wattage | 780W |
| Solar Panel Wiring | All four in series (~80 volts) |
| DC-DC Converter | Orion 70 amp 24V to 12V |
| Main Disconnect Switch | BEP 400a EX Pro Installer |
| Fuse Blocks | (2) Blue Sea 5007100 Class T |
| Monitoring System | Victron Cerbo GX & GX Touch 50 |
| AC Soft Starter | MICRO-AIR EasyStart Breeze 399 |
📊 Project Overview & Costs
🔧 Difficulty Level: Hard
⏱️ Time Investment: DIY: 40-60 hours | Pro: 16-24 hours
💰 Professional Service Cost: $8,000 - $15,000
💡 Verdict: Tackling this yourself can save a bundle, but it's a demanding project.
🛠️ Tools & Materials Used
• Sun Fun Kits 12v 340ELR 340ah LiFePo4 batteries
• Victron Cerbo GX
• Victron GX Touch 50
• BEP 400a EX Pro Installer switch
• Blue Sea 5007100 Class T fuse block
• DIHOOL Solar Disconnect Breaker
• Mollom DIN Rail breaker box
• Acer USB-a data hub
• MICRO-AIR EasyStart Breeze 399
• Orion 70 amp 24V to 12V converter
• RJ45 to USB cables
• USB cable
• Lap sealant
• Wiring
Step-by-Step Guide
Wiring the 24V Battery Bank
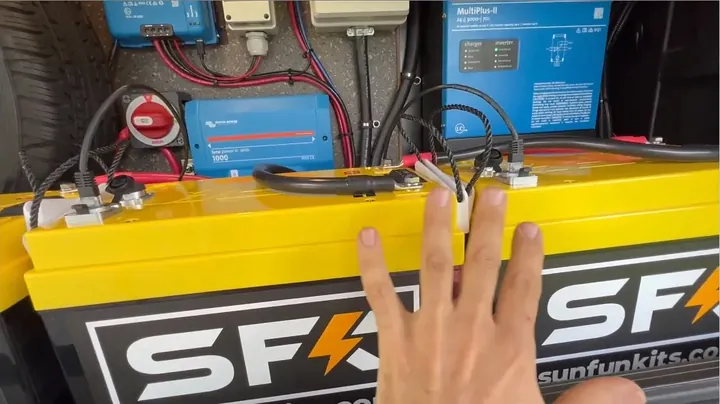
The first order of business was setting up the four Sun Fun Kits 12V 340ELR 340Ah LiFePo4 batteries. I positioned them carefully in the compartment. I wired two of these batteries in series, which created a 24V module. Then, I wired that module in parallel with another identical 24V module. This arrangement gave us a solid 24V 17.5kWh system.
The positive output runs directly to our main switch.
Below, you'll see I installed two heavy-duty Class T fuses, one for each parallel battery bank. This is a crucial safety measure; I never cut corners on fusing. The negatives tie into a modified Links Power In terminal. What's neat about these SFK batteries is they transmit their own data straight to the Cerbo GX, which means I didn't need an external shunt. That simplifies the setup significantly and provides precise monitoring without any extra hardware.

Integrating Battery Management Data
This is how we handled the data: each individual SFK battery transmits its own current flow data directly to the Cerbo GX. This setup means I didn't need an external shunt for battery monitoring, which saved on component costs and reduced the wiring complexity. That's a very clean setup.
I downloaded a dedicated SFK driver onto the Victron Venus operating system that runs on the Cerbo.
This specific driver allows the system to recognize and properly manage the SFK batteries, making them behave as a single, unified unit. I was even able to program this entire battery bank as a 24V system, configured as two batteries in series within the software, despite it being physically four batteries in a series-parallel configuration. It just works as intended.

Installing the MultiPlus Inverter/Charger
Next, I installed the core of the AC system: a Victron 24V 3000VA MultiPlus 2x120. This unit handles both inverter and charger functions, making it a critical component of the entire setup. It's designed to pass through a 50 amp shore power connection, which is pretty standard for larger RVs, allowing the internal AC loads to be powered directly from the grid when available.
When running off-grid, solely on battery power, this MultiPlus is capable of delivering its full 3000VA. That's enough power to operate one air conditioner comfortably, especially with a soft start unit installed. I did manage to get two AC units to power up, but it was a cooler day, so I couldn't confirm if both were drawing their full load. Sometimes you pull it off, sometimes you don't, but one AC is definitely achievable.
Routing Shore Power and Breaker Setup
The shore power connection on this rig is positioned at the very back, approximately 30 feet from the main power panel. Running that heavy gauge wire all the way to the front without any intermediate junctions was essential for maintaining reliability and preventing voltage drops. It's a challenging pull, but it's worth the effort for the long-term benefits.
Inside the Mollom DIN Rail breaker box, I installed four breakers. There's a triple breaker for the primary loads and an additional single breaker dedicated to the L2 line. This configuration feeds into the rig's existing stock power distribution box, integrating the new high-power system seamlessly with the original wiring. It's a clean and efficient setup. It's solid.

Solar Panel Wiring and MPPT Controller
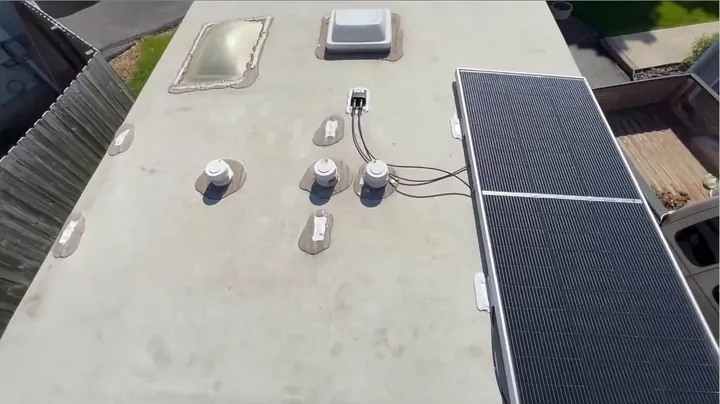
Up on the roof, I mounted four EcoWorthy 195-watt bifacial solar panels. I wired all these panels in series, which means they're collectively putting out around 80 volts into the system. High voltage and low current is the preferred method for efficiency, especially over longer wire runs.
The solar input then runs down through a DIHOOL solar disconnect breaker — that's the essential safety cutoff right there.
From the breaker, it feeds directly into a Victron 100/50 MPPT (Maximum Power Point Tracking) charge controller. This controller is responsible for taking that high-voltage solar input and efficiently converting it to the 24V needed to charge the battery bank and supply power to the rest of the distribution panel. It's quite noisy, but it gets the job done.

24V to 12V Conversion for Existing Circuits
Because this is a 24V system, and the rig still relies heavily on existing 12V circuits and appliances, a step-down converter was essential. You can't just feed 24V into a 12V fan; it would burn it out. I opted for a dedicated Orion 70 amp converter that efficiently drops the voltage from 24V down to a stable 12V. This Orion converter feeds through a small surface mount breaker. That breaker protects the 12V side from overcurrent, which is exactly what you want to. From there, it powers the original stock 12V distribution panel. I actually had to relocate that panel. It used to be mounted on the wall, but I moved it higher up to create some much-needed space. Running out of room is always a headache.
Battery Data Communication Setup
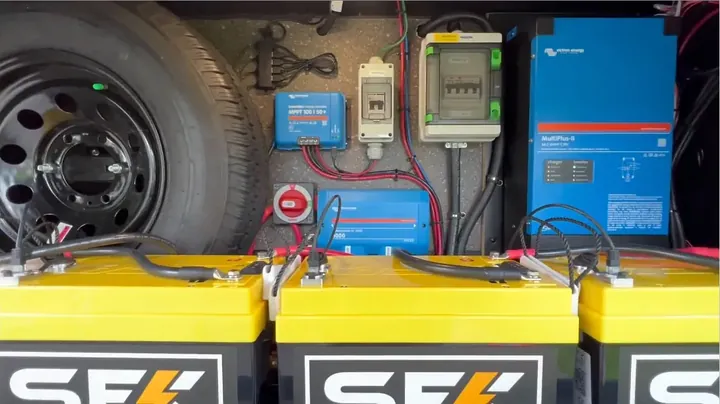
Now, for the brains of the operation: getting all the battery data to the Cerbo GX. Each of these SFK batteries has its own data port, so I ran individual RJ45 to USB cables from each battery. These cables all come together into an Acer USB-A data hub. This hub serves as a central collection point for all the battery information. From the USB hub, a single USB cable plugs into the Cerbo GX. This single connection is sufficient for all four batteries to communicate their vital statistics — things like state of charge, temperature, and current flow — to the Victron Venus OS. It's a simple, yet highly effective arrangement. That's the whole trick.

Cerbo GX Touch 50 Display Overview
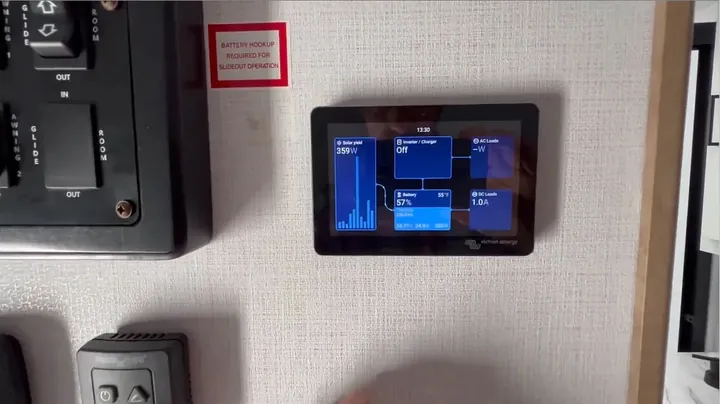
Let's move inside the rig. This is where the Victron GX Touch 50 display is installed, providing a real-time window into the entire power system. It's a very clean interface. Right on the overview page, I can see everything at a glance: how much solar power is coming in, the current status of our battery bank, what the inverter/charger is doing, and the current AC and DC loads. This visual feedback is incredibly useful for monitoring system performance and understanding exactly where your power is being consumed. It's really cool with the SFK batteries.
Configuring the SFK Venus OS Driver
This is where the SFK batteries really show their strength. I can tap on the screen, navigate to settings, and scroll down to the SFK Venus OS driver. This is the custom driver, which I downloaded via USB, that enables the Cerbo GX to fully integrate with and manage the specific SFK battery chemistry and its Battery Management System (BMS). It's a game-changer for precise control. Within this driver, I can check firmware versions and even update the driver itself. The 'virtual battery' feature is quite clever. It combines the four physical batteries into one logical unit for the system. So, the system perceives one large battery, even though it's physically four. I can also select the configuration, like two in series, two in parallel, which is the setup we're using here.

Virtual Battery Balancing and Heating Functions
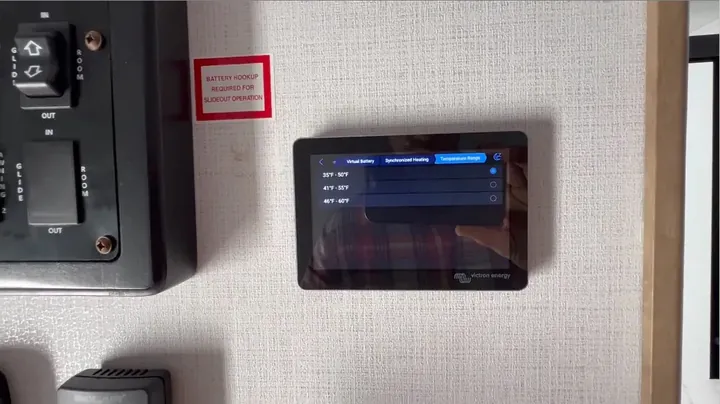
From the virtual battery settings, I can choose and activate the balancing function. This ensures that all four batteries remain in sync, which helps extend their lifespan and improves the overall performance of the battery bank. It’s critical for a healthy setup. I also have synchronized heating, which I can enable. This feature is very helpful in colder climates. When activated, all the batteries will heat themselves simultaneously. For this specific setup, I'll keep scheduled heating turned off. However, when the temperature drops below the set point, they all activate together, ensuring they can accept a charge at the same time when it's cold outside. That's a nice feature to have.

Advanced Virtual Battery Settings
With synchronized heating, the batteries will all activate at the same moment they reach that low-temperature threshold. This means they'll all begin accepting a charge simultaneously once they've warmed up, which is a significant benefit for efficient cold-weather charging. I can also restart the virtual battery from this screen, which is useful for troubleshooting. There are many different driver settings and voltage parameters available for adjustment. I get to select the connection type — in our case, it's RJ45 for the data cables. I can even fine-tune the float to bulk transition state of charge. And if I happen to misconfigure something, there’s always an option to reset everything. That's pretty convenient.
Adjusting Distributed Voltage and Current Control (DVCC)
Let's move out of these specific battery settings and return to the main overview. From there, I go back into the general settings and scroll up to DVCC, which stands for Distributed Voltage and Current Control. This is a critical setting for managing how all the different components in a Victron system interact with each other. With DVCC, I get to select the controlling BMS for the entire system. In this setup, I'm using the SFK virtual battery as the master BMS. This means the Victron system takes its operational cues directly from the aggregated data provided by our SFK batteries, ensuring that everything operates in perfect harmony. It simplifies the overall system management.

Monitoring Individual Battery Parameters
Having the SFK virtual battery serve as the controlling BMS means I can also view all its parameters directly on the home screen. That's incredibly convenient. It provides an immediate snapshot of our power situation. Within this virtual battery interface, I can delve deep into the individual parameters for each of the four batteries. I'll see their state of charge, which is a bit out of balance at the moment. So, the plan is to plug into shore power and let them all top off and rebalance. I can also monitor individual temperatures, current, wattage, and the precise voltage of each battery. I think that's pretty cool.

EcoWorthy Solar Panel Details and Installation
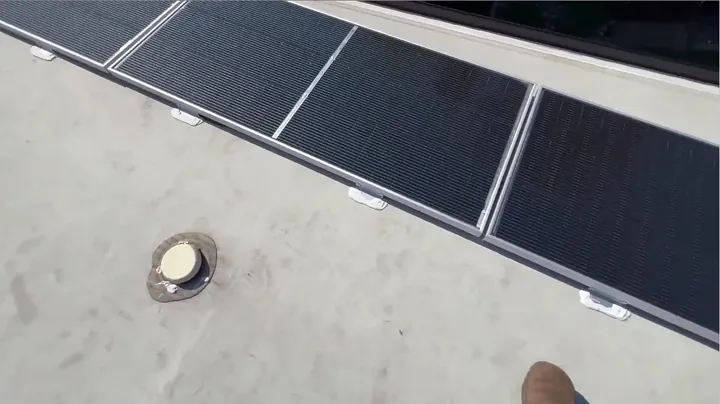
Let's take one final look at the roof of this Arcadia fifth wheel. Up here, I've installed our four EcoWorthy 195-watt bifacial solar panels, all aligned in a row. They're all wired in series, which maximizes the voltage input to the MPPT controller. these panels seem to offer good value for the money. They're bifacial, meaning they can capture a little extra power from light reflected off the roof, which is a nice added benefit. Plus, they were a better price point than some of the alternative options, like the Rich Solars. They feed into a pre-wired solar entry port on the roof, precisely where the old panel used to be. It's a simple connection.
AC Unit Soft Start Installation
This is the spot where the old solar panel used to sit. I removed it, and then I applied new lap sealant to ensure everything was properly sealed up. You simply cannot have leaks up there; that's a recipe for significant trouble. Always seal it correctly. And then, this is the AC unit that now has the MICRO-AIR EasyStart Breeze 399 soft start installed. This small device is a lifesaver for running air conditioning on smaller inverters or generators. It significantly reduces the initial current surge when the compressor engages, making it much easier for the inverter to handle the load without tripping. It just smooths things out nicely.
⚠️ CAUTION: SAFETY WARNING!
Working with 24V and 50 amp systems carries serious electrical shock and fire hazards. Always disconnect all power sources and verify de-energization with a multimeter before handling any components.
Summary & Tips
This 24V upgrade on the Keystone Arcadia is a powerful machine, plain and simple. Replacing that old 12V lead-acid setup with a 17.5 kWh LiFePo4 battery bank and Victron equipment gives this fifth wheel substantial off-grid capability. It's a complex undertaking, but the benefits in power and monitoring are immense. This rig is fully functional again, ready for any adventure.
📋 FAQ
❓ Why upgrade to a 24V system instead of staying 12V?
A 24V system offers greater efficiency for high-power applications, particularly in a large RV like the Arcadia. This allows for the use of smaller gauge wiring for equivalent power delivery, resulting in cost savings and simplified cable routing. It also reduces current draw on components such as inverters, promoting cooler operation and extended lifespan. Benefits include increased power and reduced operational complexity.
❓ Do I need an external shunt with SFK batteries and Victron Cerbo GX?
An external shunt is not required with SFK batteries. Each battery's integrated Battery Management System (BMS) directly transmits current flow data to the Victron Cerbo GX. This eliminates the necessity for an external shunt, simplifying wiring and reducing potential failure points. The result is a cleaner system configuration.
❓ What's the purpose of the 'virtual battery' in the Victron system?
The virtual battery feature aggregates multiple physical batteries into a single logical unit within the Victron Venus OS. This enables the system to perceive and manage the entire battery bank as one cohesive power source, even when composed of several individual batteries wired in series and parallel. It streamlines monitoring and control, facilitating unified settings such as balancing and heating across the entire bank.
❓ Can I run two air conditioners on a 3000VA inverter with this setup?
Running two air conditioners on a 3000VA inverter with this setup depends on several factors. The video indicates that two AC units powered on, but the actual full load was not confirmed due to cooler ambient temperatures. With a 3000VA inverter and a soft start on at least one AC, operation may be possible if the second AC's starting surge is minimal or if loads are carefully managed. For consistent, full-power operation of two larger AC units, a larger inverter, typically 5000VA or more, is generally recommended. It is a challenging application for this inverter size.
❓ Why use bifacial solar panels on an RV roof?
Bifacial solar panels are advantageous for RV applications. They generate power from both their front and rear surfaces. While the front captures direct sunlight, the rear side can absorb reflected light from the white RV roof. This allows for increased wattage output from the same panel footprint compared to traditional monofacial panels. Any additional power generation is beneficial for off-grid operation.
Disclaimer: I purchased all tools for this guide with my own money to ensure an unbiased review. This post contains affiliate links, meaning I earn a small commission if you make a purchase at no extra cost to you.